When approaching your next recording project on guitar, there are many variables to consider when dialing in the perfect tone.
Every piece of the puzzle is incredibly important from your guitar of choice, amplifier, and pedal selections; but today we are going to focus on finding the right speaker cabinet and speakers for your project and getting them dialed in for the perfect tone for your recording.
Before we get started, make sure your guitar is properly set up for your desired tuning, and that you change your strings and check the intonation. This is crucial for delivering the best possible recorded tone from your instrument before it even hits the amplifier, speaker cabinet, and speaker.
Also think about the tone you want for your recording. High or low gain? Bright or dark? Tighter bass or a more open and airy low end response? Spending time identifying the vibe you are going for and selecting the right tools for the job will save you a massive amount of time; and yield a result you are more likely to be stoked with once the project is completed.
Lets jump in!
What is a guitar speaker extension cabinet?
A guitar cabinet is essentially a wooden enclosure that holds speakers, and is designed to project the signal from an amplifier. There are a wide variety of cabinets available on the market that hold anywhere from 1-4 (or sometimes 8!) speakers, and each have different tonal qualities and responses depending on the choice of wood, overall size, and speaker selection.
Guitar extension cabinets can house 8, 10, 12, or 15” speakers, with the most common option being the 12” design. While each speaker size has a unique tonal response, the 12” is typically the go-to here as they provide the most balanced sound for a wide variety of musical styles.
Most of you will instantly recognize the iconic Marshall 4×12 extension cabinet as they were seen on countless stages in the early days of rock, and were used religiously by legends such as Jimi Hendrix, Richie Blackmore, Jimmy Page, and Slash. These Marshall 4x12s became a standard in the industry for high gain guitar tone, and can still be seen on stages and in studios across the world for their volume, power, and tone.
A look at the Design of Extension Cabinets
Before we make our selection and jump into recording, let us check out what elements and materials make up a guitar speaker cabinet.
Speaker cabinets can be constructed from a wide variety of materials, and this is important to consider for the durability and tone of the cabinet.
I’ll list the most commonly used materials below, and also how they affect the build and tone of the cabinet.
Speaker Cabinets Made With Particle Board
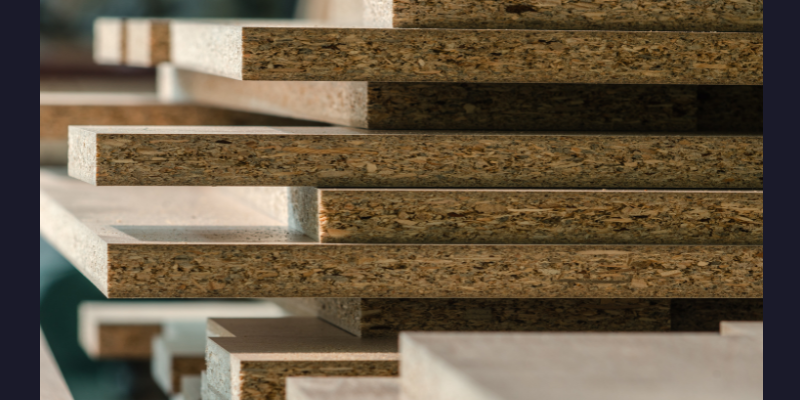
An inexpensive material that is made from wood chips and sawdust that’s held together by glue. This material is typically used in lower quality cabinets due to the lack of tonal resonance and response. This material is also not very durable when it comes to long term wear and tear, so expect to have it disintegrate if you want to take the cabinet on tour. This would be an entry level option, would yield the least flattering tonal response for the recording, and is quite heavy as well. Yikes. If you have the extra cash to spend, steer clear of particle board extensions!
MDF Speaker Cabinets

A step up from particle board, MDF is made from wood fiber that is pressed into large sheets. This material also adds excess weight to the cabinet, but is more durable than particle board. A sonically “dead” material like particle board, this isn’t recommended for guitar as it has no tonal resonance; and would remove quite a bit of “vibe” from your tone. Bass players sometimes prefer this material as it doesn’t alter the sound of the speakers due to lack of resonance, but guitarists looking for a singing and vibrant frequency response need to consider a different option.
Plywood
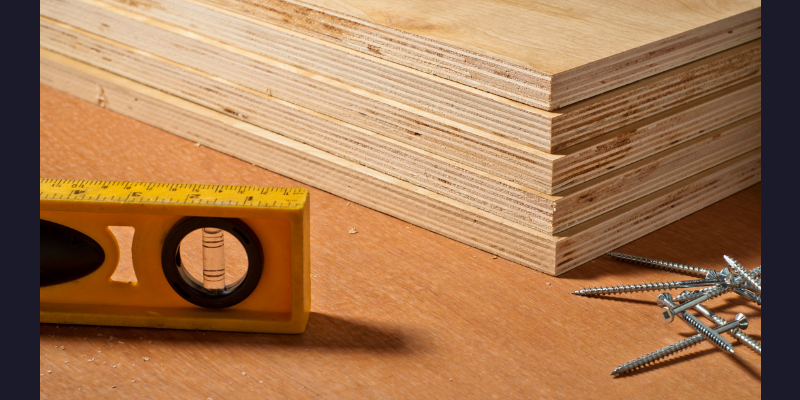
Made from solid wood that is pressed into sheets and glued together, solid wood plywood is a fantastic choice for guitar speaker cabinets. The material is much more durable than particle board or MDF, and will hold up well on the road as long as the cabinet features quality construction and assembly methods. Plywood sounds lively with more punch and definition; and is widely used on high quality extension cabinets around the world. Birch plywood is an excellent choice for live or studio use, and has become the “standard” option for most well-known manufacturers of high quality extension cabinets such as Mesa/Boogie, Marshall, and Mojotone. This would be an excellent choice for capturing great tone in the studio.
Solid Wood
A high quality option for your cabinet, solid wood is more durable and tonally resonant than the previously discussed construction materials. Solid wood construction yields beautiful overtones from the cabinet, and the type of wood(s) selected can have a drastic effect on the tonal response as well. Pine is a popular and lighter weight choice for solid wood cabinets, and is used with a ¼” finger-jointed design for many Fender and Mojotone extensions for an open and well-balanced tonal response. This is another excellent choice that will give you a fantastic feel and tonal response for your recording.
Speaker Cabinet Construction – MDF vs Plywood
One of the most sought after questions amongst forums is MDF vs Plywood, and there are definite tonal + construction differences in the two. MDF offers a more flat sound (preferred by Bass players), while plywood cabinets have more resonance. And, maybe most importantly, plywood can be taken on the road because if MDF cracks or gets wet, the cabinet begins to deteriorate while their plywood counterparts will maintain their construction.
Open Back or Closed Back Speaker Cabinet?
Outside of the speaker configuration and overall size, extension cabinets also have another design option……open back or closed back. This term explains itself……but how do these designs affect the tonality and response of the cabinet? Tone (as always) is subjective, so try both designs out for yourself and see what sounds and feels the best to you!
The more popular “closed back” design is defined when the speakers are fully enclosed inside of the cabinet by a solid back panel. This yields a bolder and tighter low end response with a focused mid-range character that sounds great for higher gain applications. Go with a closed back design for distorted mid-to-high gain guitars as this will yield a tone with a tight low end and more forward mid range that works wonderfully in a mix.
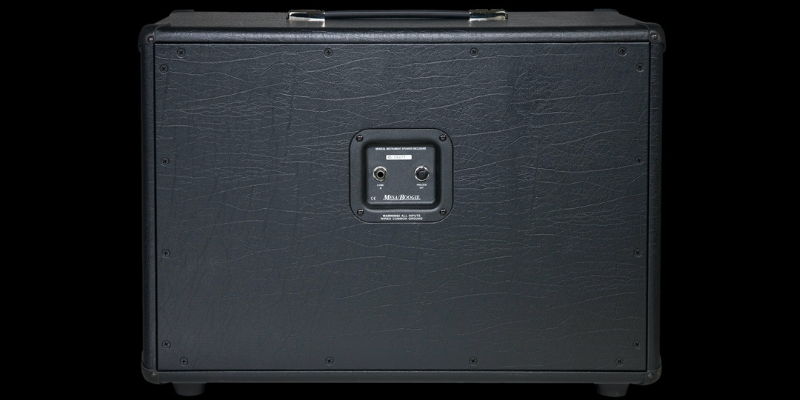
An “open back” design has a portion of the back panel removed from the rear of the cabinet, and this results in a more open and airy sound that works beautifully for cleaner guitar tones. The design allows air to escape from the rear of the cabinet, and this allows more space for the tone to “bloom”. Go with an open back design for a brighter sound with increased presence and top-end cut to stand out in the mix.
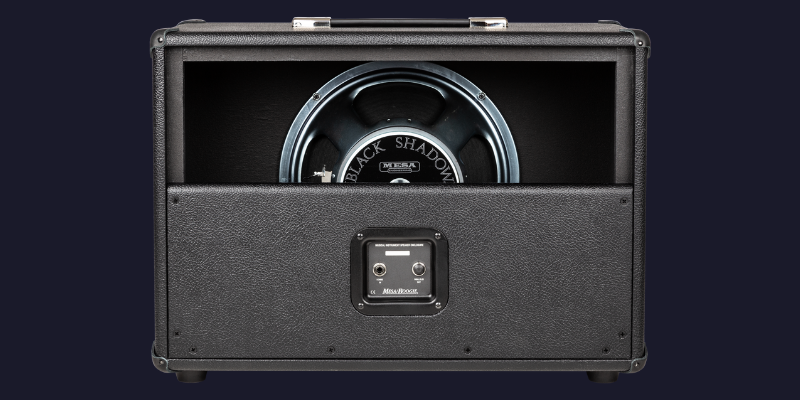
What is better – Open or closed back speaker cabinet?
As I mentioned before, tone is super subjective, and there is no “right” or “perfect” tonal combination. If you are tracking rock or metal guitars, a closed back cabinet might be the right choice for the tighter low end response and more natural compression in the upper midrange.
If you are looking for a blooming, chimey clean tone with a looser low end, then the open back design would be the better choice here.
Try them both, and let your ears decide!
Speaking of speakers in cabinets…
Now that we have selected either the open or closed back design for your cabinet, we need to determine what speakers to install to get the desired tone.
Make sure to consider the power handling (or wattage) that your speakers must be able to handle. The cabinet’s power handling must match or exceed the maximum power of your amplifier, or permanent damage can occur.
For cleaner sounds, a Jensen C12Q or a Mojotone Anthem AN12 are excellent choices for a wide open and bell-like tone that would pair perfectly with an open back cabinet.
For something more authoritative in the higher gain regions to pair with the closed back cabinet, a higher efficiency speaker like an Eminence Swamp Thang or the incredibly popular Celestion Vintage 30 would be excellent choices here. These speakers both have a pronounced mid-range and tighter low end that sound fantastic with high gain guitar.
On wiring your speakers for the correct Ohm load in an extension cabinet
Before you record, make sure the impedance of the cabinet and speakers match your amplifier of choice. Impedance (which is measured in ohms) refers to the combined total load that your speaker cabinet will place on your amplifier. Mismatches here can severely damage your equipment, so proceed with caution before cranking up to record!
You should find your amplifier’s outputs on the rear of the cabinet labeled with the ohm load, and from there connect the appropriate output to the matching input on the extension cabinet.
While you can have safe mismatches, it is recommended to always match the ohm load between the cabinet and amplifier.
Using a 1×12 extension cabinet is fairly simple as you would need to match the ohm output from the amp to the rating on the speaker (e.g. 8 ohm speaker connects to the 8 ohm output on the amplifier).
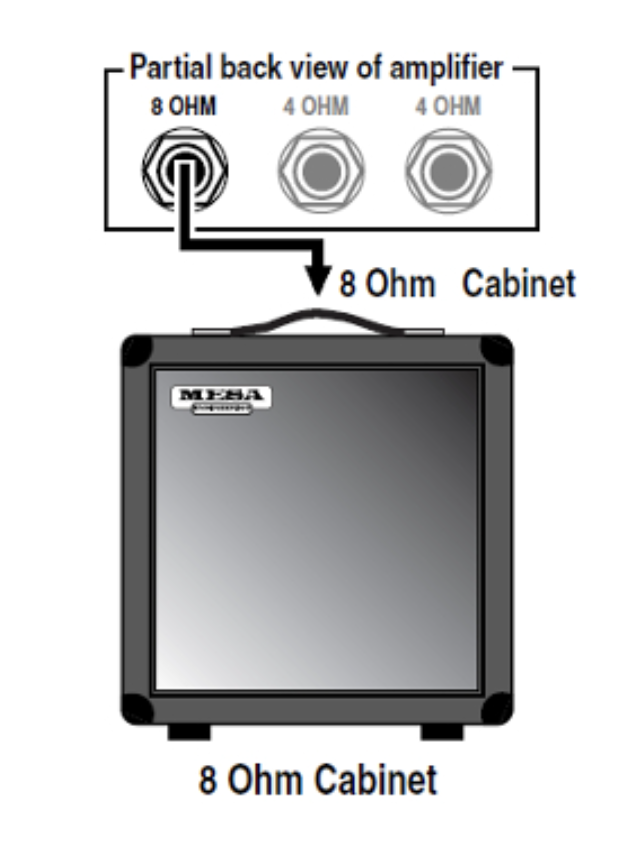
Generally there are two ways to wire multiple speakers together; Series and Parallel.
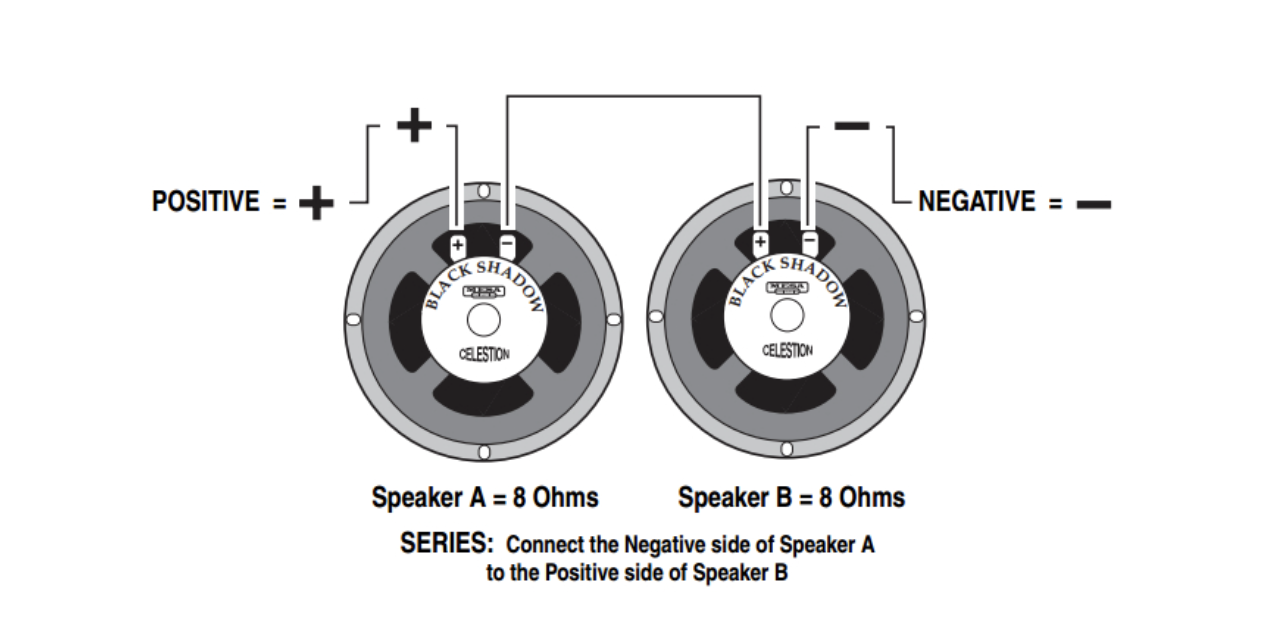
When you wire speakers in Series, the speaker’s resistance is additive resulting in a doubled ohm load. Check out the below diagram for two 8 ohm 12” speakers wired in Series to a final load of 16 ohms. You would use the 16 ohm output on your amplifier to connect to the cabinet with this wiring scheme.
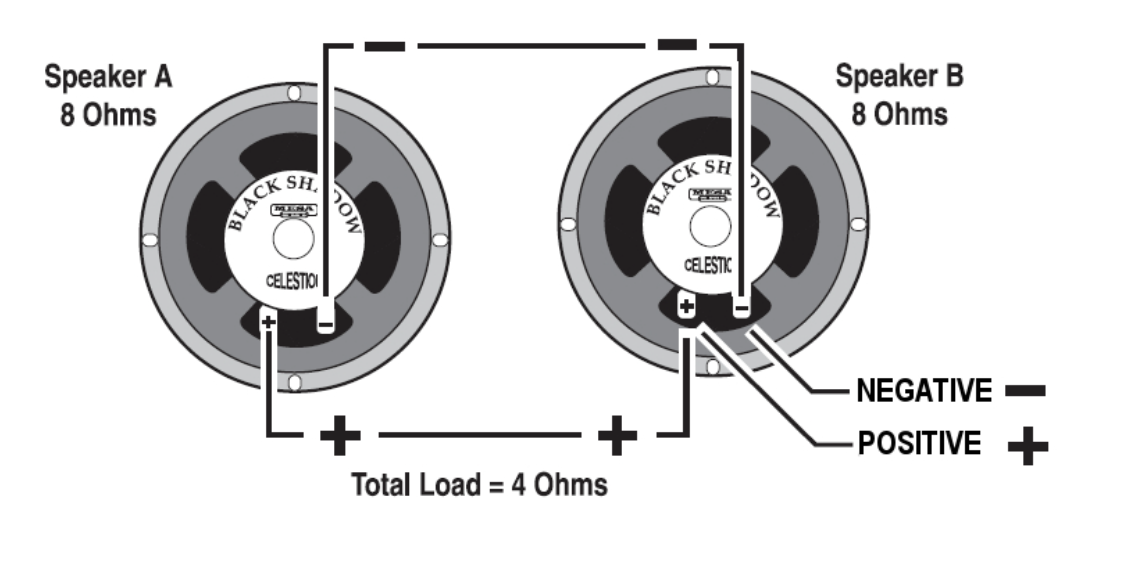
You can also wire the speakers in Parallel, and this results in a subtractive effect on the overall ohm load. Using the same speaker set up as above, you would end up with a final load of 4 ohms and use the 4 ohm output on your amplifier with this wiring scheme.
With our cabinet selected and speakers installed and wired correctly, it’s time to mic the cabinet
I typically like to place my microphone of choice right on the grill of the cabinet just on the outer edge of the center dust cap of the speaker. The SM57, Sennheiser e609, or a similar dynamic mic is a great place to start here. This typically gives me a well balanced sound right out of the gate, but sometimes I need to adjust the mic position depending on what I’m hearing in my DAW.
The closer you place the microphone to the grill, the more overall low end bass response you will hear. Moving the mic back further away from the grill will lessen the low end response and allow more “room” or “air” to be heard in the signal.
If your recorded tone is too bright, move the microphone more towards the outer edge of the speaker. You should hear your tone get darker the further you move away from the center of the cone.
Inversely, moving your microphone closer to the center of the speaker will add brightness to your tone.
Check out Fig.1 for an example of how mic position affects the tone.
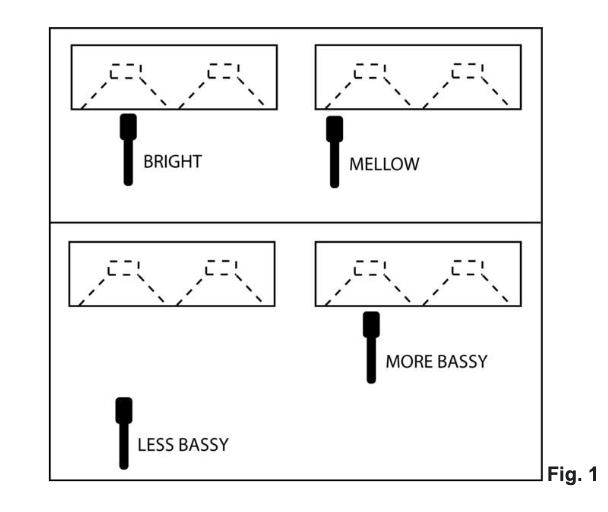
Remember the mic “hears” the speaker differently than you do when standing in the room with the amp, so small moves translate to big tonal changes here
Now that we have selected our cabinet and speakers, matched our ohm rating, and placed our microphone in the perfect spot, it’s time to start recording!
Continue to ask yourself how the tone makes you feel and how it works with the other elements in your mix. Feel free to experiment with different cabinets, speakers, and mic positions until the tone in your head is coming out of your studio monitors. These near-infinite variables and options are a part of what make our job as audio engineers fun, and taking the time to experiment here can yield some amazing tonal options and discoveries.
I hope this article helped you identify and select the right cabinet and speaker combination for your recording project; and I wish you the best on your tone journey. Thanks for hanging, and happy tracking!
